You all know that I am a HUGE fan of making jackets and coats. This year, I decided to add a waistcoat/vest into the mix as well. Vests had a moment earlier in the year, and of course I am always late to the party. Fashionably late, of course!
I looked at a couple of options, and the one that caught my eye was the Style Arc Joy Vest.
Pattern Description
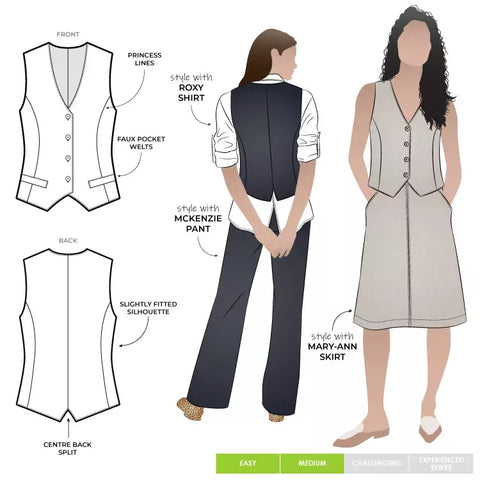
Per Style Arc's website: "Easy fit vest with faux welt pocket and button opening."
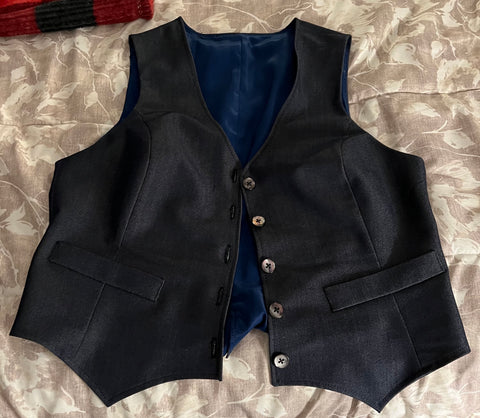
This is a single breasted waistcoat, with a curved and peaked (pointed) hem. I like Style Arc because their size 10 fits me pretty well with just a few adjustment. The vest is fully lined, and has faux welt pockets. I thought about turning them into real welt pockets, but the truth is that I wouldn't use them, so I decided to leave them be. If I ever start carrying a pocket watch, I'll add them.
Fabrics Used
I've made this pattern twice now, 2 1/2 times, if you count the fitting muslin. The first version is lightweight stretch denim (long since sold out, but there are some good options at Gorgeous Fabrics). The second version uses Between the Lines Italian Double Faced Faille Panel - Black/White. This is a very cool fabric that gives you tons of options for contrast. It's a panel, and there are two different prints in each panel: one with lines running more or less parallel to the selvage, and one that looks like tiny brickwork. One side is predominantly black; the other side is predominantly white.

A Note About the Cotton Faille
I want to thank everyone who has said SUCH nice things about the black and white cotton faille version. But I do have to set one small thing straight. Several people have admired my ability to find complementary fabrics. I wish I was good at that! This is made from a single, double sided fabric. I just took advantage of a beautiful happenstance.
For linings, I used NY Designer Stretch Pongee Lining - Navy Blue with the denim, and Wide! Calamo Silk Habotai Lining - Black for the cotton faille.
Tools/Notions Used
This pattern is pretty straightforward, and doesn't require a lot of tools. Thread, interfacing (more on that in a second)... that's pretty much it.
The pattern includes pieces for interfacing along the neckline and front. Instead, I used Fusible Bias Stay Tape in the seams.

I'm just going to gush here for a second. This tape is lightweight and adds no bulk. It's easy to apply and adds no bulk to your seam. I. Love. It!
Construction Notes
First up, I made a slight FBA (1/2 inch). That seems to work well for me with Style Arc patterns.
As is the case with Style Arc, the instructions assume you have some familiarity with construction techniques. They use a modified burrito method for sewing the shoulder/neckline/armscye seams. If the instructions seem confusing, there are lots of videos out there on how to achieve a good finish.
The pattern instructions have you cut two of each major pattern piece (front/side front/side back/back). Style Arc lets you decide if you want to cut any or all of the "lining" pieces in lining or self fabric. In the denim version, I used self fabric for both the front and the front "facing."I used the lining fabric for the rest of the inside.

The cotton faille double cloth is stiffer, so I lined it edge-to-edge with habotai.

Finishing
Most of the vest is sewn on the machine, with just a few inches of hand-sewing in the side seam after you pull everything through. I used shell buttons on the denim version, and happily, I had some extra buttons left from my Rockstar Frock Coat that look great with the cotton faille.

Conclusion
I love this pattern, as you can probably tell. It fits a space in my wardrobe, and it's the kind of garment I can dress up or down. Don't be surprised if this shows up often in my "I sewed" list. Here are some pictures of the denim on me and the faille on Shelley. I'll get pictures of the faille on me soon, I'm sure.


Happy sewing!