

If you follow me on social media, you know that for the last few weeks I've been working (on and off) on the trench coat from Issue 1 of Maria Denmark Sewing's Sewing Life Magazine. This is a double-breasted, unlined coat, with, per the website, "a back flap, shoulder straps, sleeve belts, a wide belt, and tons of buttons! It is unlined, and the seams are finished with bias tape." It also has in-seam pockets with single welts, or if you prefer, patch pockets with or without pleats. The magazine, which is available electronically via subscription, includes instructions, fitting and styling advice and articles on constructing the coat from start to finish.
(Ducking my head behind my hand) I didn't use any of those. I just made it, and I wung a few parts based on my knowledge.
Also, please be aware while reading this post that Maria is a very good friend. I pay a subscription fee for the magazine ($10 per issue), and I don't get any discounts, nor do I ask for any. Maria has not asked me to review her patterns, so this is my own doing.
All those disclosures done, I'm on a coat-making jag recently (evidenced by my Frock Coat and the patterns that are currently sitting on my cutting table waiting for me). This is the latest iteration, so let's have a look.
I traced the pattern (size 40) and added seam allowances.
I made a muslin and determined that I would benefit from a FBA. I also discovered that the pockets, as drafted, were too small for my taste, so I enlarged them and the pocket opening/welt.

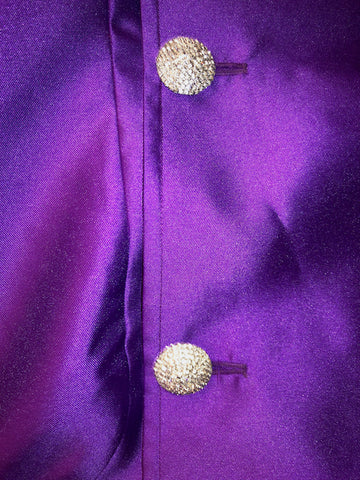
For the coat, I used NY Designer Satin Mikado - Royal Purple, and I used Hong Kong Binding made with Calamo Silk Organza in Black.
I made the pocket welts using the origami welt technique I learned from Kenneth King. Pamela Leggatt also has a video showing how to do it on the Threads site.

As I mentioned, I finished the seams with bias strips of Calamo Silk Organza.

I also added lining to the Back Flap. Why? Because I can! 😆

Another thing to note is that when I pressed the seams (making The Pressinatrix proud), I put a clapper on the seams after pressing/steaming. The important part of that is that I didn't put any pressure on it. I just laid the clapper atop the seam, let it cool, and voila, the seams looked great.
I decided to bling this baby up, so I bought rhinestone buttons and a rhinestone belt buckle from M&J Trimming. Let me tell you, that bling cost about 10 times as much as the rest of the coat, but it's worth it! I used 9 large buttons, and two small buttons.


The pattern calls for epaulettes, which I left off because while I like the look, they drive me crazy and interfere with my shoulder bag straps. I bought a large rhinestone buckle for the belt. Here's my advice - wait until the buckle arrives before you make the belt. The buckle's actual measurements were smaller than the M&J website description. I had originally cut the belt to the same dimensions as my Burberry trench (60 inches long, 3 inches wide), but I had to recut when the belt buckle arrived because the crosspiece that you loop the belt through is 2 5/8 inches.
Finally, I took the coat to Jonathan Embroidery in New York this week when I went on a buying trip. The buttons were bigger than any of my home machines could handle, but they were able to zip them up right away. If you have the opportunity to go to NYC, bring anything that might need buttonholes with you. They charge $1 each, and they do such a great job. It's worth every, single, penny!
The pattern went together beautifully, and I'm really happy. I spent time with Maria earlier this week, and she took some pictures of me in it (it was missing some buttons, but you get the gist), so here you can see them.


I'm not sure what I'm going to make next.
I'm in the midst of moving Gorgeous Fabrics' Galactic Headquarters to larger space at the end of this month, so I am reluctant to commit to a big project, but we'll see.
Happy sewing!
Ann

