Well, it has been a while since I last posted! Part of the reason is because I've been tremendously busy putting new fabrics up and shipping them out (thank you). And another is because I've been working hard on a pretty epic project, Kenneth King's Raglan Sleeve Coat Class, and the resulting garment. Grab a cuppa and settle in comfortably. This is a rather long one, and very picture heavy.
Before I begin, let me say that Kenneth King is a dear friend and professional colleague. However, I paid full boat for the class and I am doing this review on my own; Kenneth has not asked me to post anything.
The Class Itself
Kenneth offers his Raglan Sleeve Coat Class a few times per year. It's an 8-week class with one session per week. The class I took was held on Saturdays from Noon to 1:30 PM Eastern. The class is live over Zoom, so attendees were from all over the world. The class is a combination of pre-recorded videos walking step by step through construction, and live, so people can ask questions and Kenneth can stop the video and explain things in depth. Kenneth also records the live sessions. The videos remain available to students after the class concludes. Kenneth sends the links to them after each session.
The link to register for Kenneth's classes, including this one, can be found on Kenneth's Website.
There is an accompanying pattern for the coat available for purchase from Sewing and Design School in Tacoma, WA. You don't have to take the class to purchase the pattern.
In addition to the videos and in-person sessions, each student is entitled to a 1-hour one-on-one "Office Hour" with Kenneth. I made my muslin and Kenneth evaluated the fit and offered suggestions for adjustments (in my case, a FBA and adding an inch to the front piece and front sleeve). You can use the office hour for anything related to the coat, not just fitting.
So, What did I Think?
Loved. It. Kenneth is a generous, thoughtful, and fun teacher. He really brings the process of construction to life, both in his pre-recorded videos and in the live sessions. Each session goes through one construction step. The progression of the class is logical and ensures that you know all the steps in great detail. Kenneth did all the filming himself, and he has it down, I tell you. I learned SO much, and he drops all sorts of pearls of wisdom that will translate to other sewing projects as well. I won't divulge his trade secrets, but let me just say that the session on the collar paid for the entire class, IMO.
And Now Onto the Coat
This was an epic project, so I'll let the pictures do most of the talking. I used a novelty wool jacquard that I bought for Gorgeous Fabrics, but when I got it back to the office, my inner evil twin said, "Oh no! This baby is going to be for me!!!" I brought it to a laminator on 37th Street and had the fabric fused to tricot, to give it a little more body.
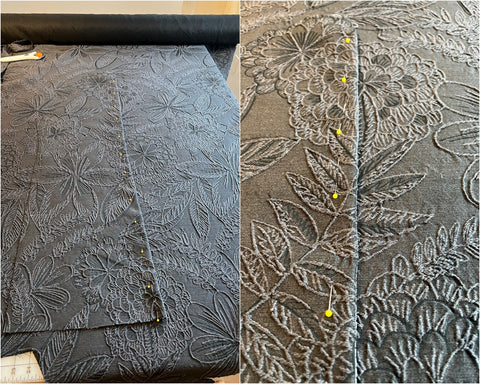
Because the jacquard pattern on the fabric is so lovely, I worked hard to match the motifs across the CF and CB. I was less worried about the side and sleeve seams, but I did carefully lay out my pieces. I cut everything out in a single layer.
The pattern is designed with 1/2 inch seam allowances, but I decided to extend that to 1 inch at the center back seam. I left the others at 1/2 inch. Because the CB seam is curved, I wasn't able to have the motifs cross the seamline all the way down, so I decided to go for the best match between my shoulders. To do that, I machine basted the seam line with contrasting thread.

I then pinned the seam allowance out of the way and matched up the motif, laying the other half of the back pattern piece so that the CB sewing lines matched up.

As a side note, this is the polar opposite of no-waste sewing. Sorry not sorry. But IMO the results are worth it.

The most nerve wracking stage of construction, for me at least, was the welt pockets. Kenneth does a marvelous job of explaining and showing how to insert them, including how to match a relatively simple design in the fabric. Because my fabric's design was anything but simple, I spent a lot of time working out the placement of the welt pattern pieces. One of them turned out perfect, the other was close enough that only I see the slight mismatch. But as Kenneth once told me in another class, "If anyone gets close enough to you to examine your stitching, you have the right to slap 'em." 😂
I did a mockup of the welt construction first, to make sure I had the steps down.

When I was satisfied with that, I made the pockets on the coat.


I pick stitched all the major seams (except the CB), the facings, collar, cuff latches, and the welts. After that, I sewed all the major seams, and got to work on the lining. Once again, I got kind of obsessive about matching the motifs on the lining across the center back seam. Yeah, I'm insane.

I then sewed the lining to the facings, and the facings to the coat. One nice thing is that the lining is inserted by machine. You can insert it by hand if you want to, but Kenneth's method was really fast and foolproof.

Lastly, the hems of the lining are sewn by hand to the coat using a fell stitch.

And voila! The major construction steps are all done! I now need to find the perfect buttons, which I'll do (hopefully) when I go to New York next week. I'll also take the coat to Jonathan Embroidery while I'm there to have them make the buttonholes. If you are in NYC, and you need buttonholes, Jonathan is a treasure. They charge $1 per buttonhole, and they'll even sew your buttons on your garment for you!
If you have the chance to take this class with Kenneth, either remotely or in person, DO IT. It is worth every single penny. I'm really happy with my coat and with all the techniques and tips I learned. Here are pictures of the coat on Shelley. I'll model it once I have the buttons sewn on. I'll give it a better pressing then, too.I figure since I'm going to put it in a bag and bring it to New York, I'll wait until after that to give the final press (though I pressed every seam at every step of the process, of course).


Wow, that was a novel. I hope it helps, and as always,
Happy sewing!